ConceptHMI Web Help
Translating a complete application
ConceptHmi provides an easy to use mechanism to declare and translate the texts of your application. This mechanism gives you the possibility to manage different languages in your application and offers the following features :
When developing an application, it is important to identify and declare translatable texts with the right syntax. A translatable text can be defined in WPF files and C# files.
 |
It’s better to work with translatable texts from the beginning of the application development, even if no translation is planned for now. The overhead of declaring a translatable text over a simple text is very little if done directly. |
The translation mechanism is named Intl. An Intl text needs two pieces of information:
|
When declaring a new translation in C#, it is important to define a unique FullKey using a fixed naming convention, below is the one we recommend. Namespace.Class.TextDefinition |
|
If a single translatable text appears in different places, the same FullKey can be used several times. In this case, the FullKey can be named using TextDefinition only. |
To define a translatable text in XAML files, use the IntlExtension.
When defining the international texts in a WPF UserControl you can simply use the Intl key. The full key is automatically created.
<TextBlock Text="{concept:Intl Key=MyTradcutibleText, DefaultText='My traductible text'}"/>
When you define international texts in a data template or control template you must use the Intl full key. In this case, it is impossible to automatically create the full key.
<TextBlock Text="{concept:Intl FullKey=Framework.HomeView.MyTradcutibleText, DefaultText='My traductible text'}"/>
In C# code, there are two possibilities to define an Intl text :
If a translatable text must be assigned to a string, use the static method Intl.Text. In this case, translation is performed during the execution of the assignation and not later on.
Machine = new Machine();
Machine.Description = Intl.Text("Framework.FrameworkController.Machine.Description", "My Machine Description");
The Concept elements integrate directly Intl objects. In this case, translation is updated when the selected language changes.
JobManager = new ProjectManager<Job>("JobManager", JobExtension,
     new IntlText("Framework.FrameworkController.CurrentJob", "Current Job"));
oStudio comes with oDictionnary, a tool designed to manage application languages and translate all the Intl texts of an application. This tool provides the following features :
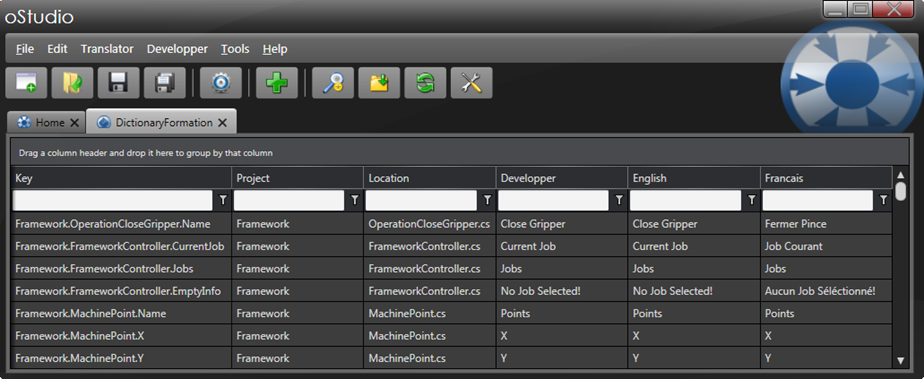
|
You can download the oStudio installer here: http://www.objectis-software.com/download-ostudio-2013/ |
|
To have more information on oStudio – Dictionary take a look at the user guide : |
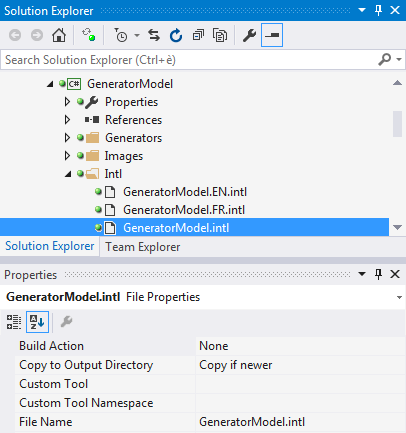
The oStudio Dictionary plugin generates one translation file for each language and an additional file referencing them. Below is an example of such a file.

In a Visual Studio solution, each project has an Intl folder containing the « .intl » files generated by the oStudio plugin Dictionary. In the Properties tab of Visual Studio set Copy to Output Directory to Copy if newer for each of these files.
This way each project of the solution will have their translation files copied in a folder "Intl" in the application’s output directory.
The startup project of your solution must contain an .intl file containing references to every translation files necessary to the application. This file also has to be configured as Copy if newer in its properties, as shown below.
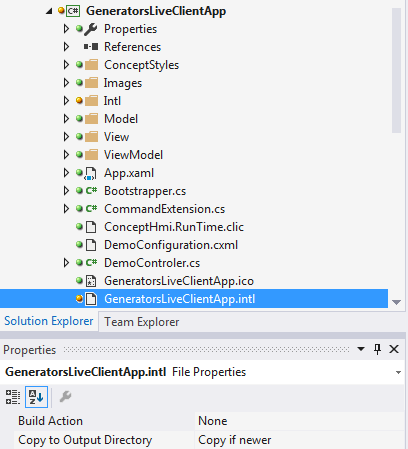
It is important that this file be copied next to the executable of the application. Below is an example of the content of this file.
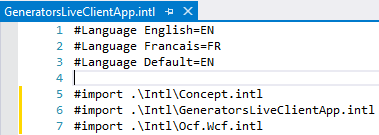
The first three lines give the language name corresponding to each language code and the default language of the application. The next lines describe the path to the main translation file (the file referencing every languages files) of each project contained in this application.
A plugin project needs to have the same translation structure than a normal project that is a folder named "Intl" containing the generated translation files with their properties set to Copy if newer.
Concept Hmi libraries come with an Intl folder. The content of this folder has to be added with the other translation files of the application. To do so, you have two possibilities.
The first one is to add these files to the Intl folder of the startup project and copy them to the binaries folder (Copy if newer setting).
The second one is to add a post-build event command in the startup project properties to directly copy the content of the Intl folder located next to the Concept Hmi libraries. Here’s an example of such a command.
xcopy /y /d "$(ProjectDir)Libraries\Intl" "$(ProjectDir)$(OutDir)\Intl"
Concept provides a control to easily manage languages and translation files of an application. This control is called: ConceptLanguagesView.
The upper part of the view shows the list of languages supported by the application. The user can change the language of the application by simply selecting a different language from that list. Each language in the list has a LED indicating the percentage of the translations. Green indicates that everything is translated, red warns that some keys don't have a translation and gray informs that the language files are not defined.
The lower part of the view shows the list of all INTL files used by the application. It is also possible to open the INTL file in the Windows Explorer directly from this view.
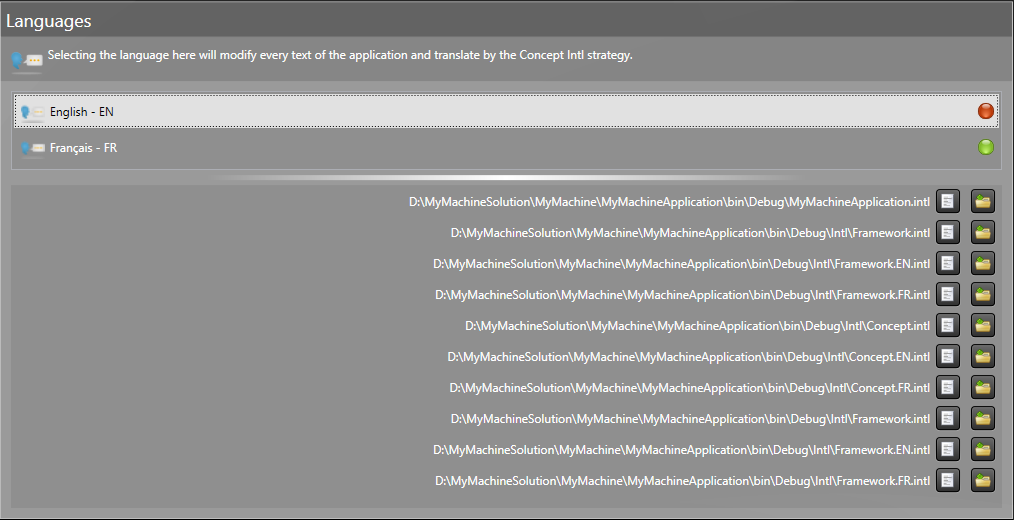
Below is an example of use of the ConceptLanguagesView. Simply add this control to the view of your choice to see it displayed in your application. The behavior shown above will be available automatically.
The IsAdminMode property gives the possibility to choose between a detailed view or a simplified view. The detailed view contains the language selection and the list of files INTL, while the simplified view contains only the language selection.
<concept:ConceptLanguagesView IsAdminMode="True"/>
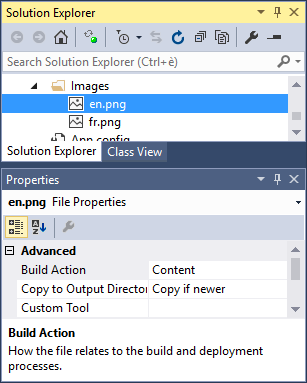
The translation system gives the ability to define an icon for each language of the application.

As for INTL files, languages icons don't need to be added to the visual studio solution. The images should only be accessible from the application's output directory at the right place. To define the icon of a language, modify the Intl base file and add the icon path in the language declaration as shown below. The file path can be absolute or relative to the application's executable.
#Language English=EN=Images\en.png
#Language Français=FR=Images\fr.png
#Language Default=EN

#import .\Intl\Concept.intl
#import .\Intl\GeneratorsLiveClientApp.intl
#import .\Intl\Ocf.Wcf.intl
It is also possible to add the language images in the visual studio solution and copy them automatically in the output directory. In the Properties tab of Visual Studio set Build Action to Content and set Copy to Output Directory to Copy if newer for each one of these images.
 |
In order to keep the ability of adding INTL files and language images without making use of Visual Studio, vector images are not supported in the definition of language icons. |
To resolve a translation the Intl mechanism searches for the text to display in this order :
![]()