ConceptHMI Web Help
Designing and implementing a model
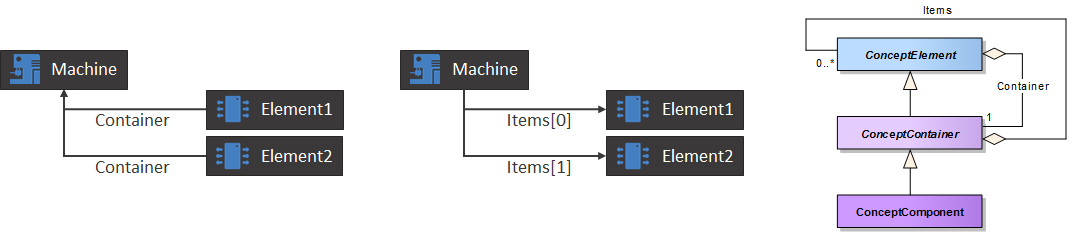
Concept provides three inherited classes to easily build your model. These classes are ConceptElement, ConceptContainer and ConceptComponent, they provide the different features of Concept model. To benefit from all the Concept features, the classes created in your model must inherit from ConceptComponent.
The abstract class ConceptContainer has been created to facilitate the creation of complex and powerful hierarchical models.
 |
A Concept hierarchical model will be called Concept object tree in the next chapters. |
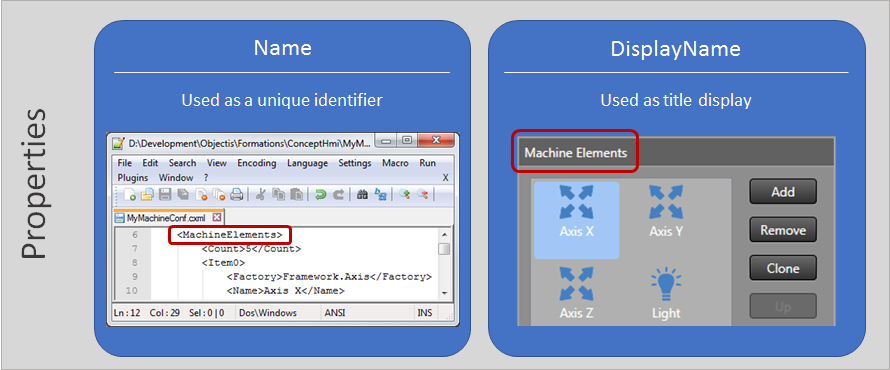
All objects in a Concept tree must be found by their absolute path (from the object up to the root) to give the ability to define links, serialize the model and more. To create the path of a Concept object, the object must have a unique identity within its parent. Concept uses the name property of a ConceptComponent as an identifier, which means the name must always be unique as it is used to build the object path.
 |
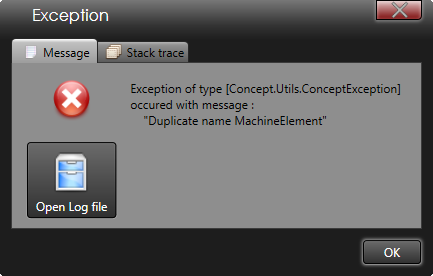
If two ConceptElement with the same name are added to a ConceptContainer an exception is thrown (duplicate name exception). |
When a component is instantiated, Concept automatically generates a default name for it regardless of the instantiation type. The default name is the type name of the instantiated class, except when the ConceptAutoCreate attribute is used. In this case the default name is the property name or the name passed to the attribute's parameter, as shown in the example below.
Element = new MachineElement(); // Name = MachineElement

[ConceptAutoCreate]
public MachineElement MyElement { get; protected set; } // Name = MyElement

[ConceptAutoCreate("Element")]
public MachineElement MyElement { get; protected set; } // Name = Element
The ConceptElement class also contains a display name. The display name property is used to display a user friendly name in application views. If the display name isn't defined, the name property is used as the default value. To specify the display name of a component use the ConceptName attribute on a class or a property .
|
To make the display name translatable use the IntlConceptName attribute instead of the ConceptName attribute. For more information see translating a complete application. |
[ConceptAutoCreate]
[ConceptName("Machine Elements")]
public class ConceptStaticList<MachineElement> MachineElements { get; protected set; }
When a model is developed with Concept simple classes of this model must inherit from ConceptComponent to benefit from all the Concept features. As ConceptComponent inherits from ConceptContainer all model elements will have an internal list which contains their child elements. It is important to add the child elements in the internal list because this list is used by mechanisms such as data serialization and automatic edition of a data model.
The ConceptContainer class provides some methods to manually create and add a ConceptComponent in a Concept object tree. The first method is the Add method of ConceptContainer. In the example below, we add the Element property inside the internal list of machine.
|
A good practice is to always declare the property setter as protected to avoid overwriting of this property from the outside. |
public class Machine : ConceptComponent
{
    public Machine()
    {
        Element = new MachineElement();
        Add(Element);
    }
    public MachineElement Element { get; protected set; }
}
As we saw earlier, by default the property name of Element is set to MachineElement. The default name of a new object is defined with the type name of this object. If we create two MachineElement like in the following example, Element and Element2 will have the same default name. Using the Add method with these two elements generates a duplicate name exception.
public class Machine : ConceptComponent { public Machine() { Element = new MachineElement(); Add(Element); Element2 = new MachineElement(); Add(Element2); } public MachineElement Element { get; protected set; } public MachineElement Element2 { get; protected set; } } |
 |
To generate a unique name, Concept provides the GenerateUniqueName method. The parameters of this method are the element to rename and the desired base name to use to generate the unique Name. The uniqueness of the name is guaranteed by the internal list of the machine object.
|
If the base name isn't unique, the unique name is built by following this rule : Base name normalized + separator + number that makes the name unique Below are a few examples of possible generated unique names: MachineElement MachineElement_1 MachineElement_2 MachineElement_N |
public class Machine : ConceptComponent
{
    public Machine()
    {
        Element = new MachineElement();
        Add(Element);
        Element2 = new MachineElement();
        Element2.Name = this.GenerateUniqueName(Element2, "MachineElement");
        Add(Element2);
    }
    public MachineElement Element { get; protected set; }
    public MachineElement Element2 { get; protected set; }
}
To simplify the creation of a ConceptComponent, Concept provides the AddNew method. With this generic method all the steps described before are managed by Concept. This method creates the MachineElement, generates a unique name and adds it inside the internal list of machine. The MachineElement created is returned by this method.
public class Machine : ConceptComponent
{
    public Machine()
    {
        Element = AddNew<MachineElement>();
        Element2 = AddNew<MachineElement>();
    }
    public MachineElement Element { get; protected set; }
    public MachineElement Element2 { get; protected set; }
}
Concept provides an easy way to automatically create and manage a ConceptComponent. This way is to make use of the ConceptAutoCreate attribute. This attribute creates the MachineElement associated, generates a unique name and adds it inside the internal list of machine.
|
By default, the Concept auto create attribute uses the property name as the unique name. |
public class Machine : ConceptComponent
{
    [ConceptAutoCreate]
    public MachineElement MachineElement { get; protected set; }
}
Concept provides a component which enables us to create an optional polymorphous composition and have it automatically serialized. This component is a ConceptDynamicComponent. Below is the UML representation of a ConceptDynamicComponent of Tool. Only a tool (Laser or Gripper) can be set inside the ConceptDynamicComponent.
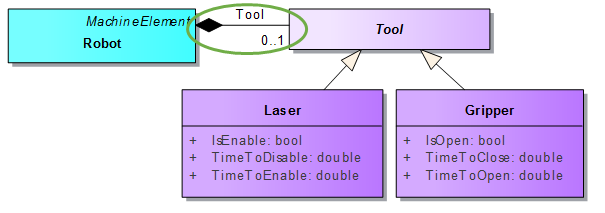
The example below shows how to automatically create a ConceptDynamicComponent with the ConceptAutoCreate attribute. The ConceptDynamicComponent provides the Component property used to define and remove the polymorphous component.
public class Robot : MachineElement
{
    public Robot()
    {
        // By default the dynamic tool is a laser
        DynamicTool.Component = new Laser();

    }
    [ConceptAutoCreate]
    public ConceptDynamicComponent<Tool> DynamicTool { get; protected set; }
}
When we work with a ConceptDynamicComponent a good practice is to create a specific class which inherits from ConceptDynamicComponent. The advantage of such a practice is that it is easy to modify the component for example to change its default image (see automatic edition of a data model chapter for more information on ConceptSmallImage and ConceptLargeImage attributes).
public class Robot : MachineElement
{
    [ConceptAutoCreate]
    public DynamicTool DynamicTool { get; protected set;  }
}

[ConceptSmallImage(typeof(DynamicTool), "/Images/Tools32x32.png")]
[ConceptLargeImage(typeof(DynamicTool), "/Images/Tools64x64.png")]
public class DynamicTool : ConceptDynamicComponent<Tool>
{ }
To work more efficiently and to enable us to write shorter code, we usually create a wrapper to access the contained component.
public class Robot : MachineElement
{
    [ConceptAutoCreate]
    public DynamicTool DynamicTool { get; protected set;  }

    public Tool Tool { get { return DynamicTool.Component; } }
}
|
We have established a naming convention for ConceptDynamicComponent properties. This convention enables us to understand the function of the property only with its name. The name of ConceptDynamicComponent property is : Dynamic + NameOfElement The name of wrapper property is only : NameOfElement. |
Concept provides a component which enables us to manage elements of the same nature and automatically serialize all its children. This component is a ConceptStaticList. Below is the UML representation of a ConceptStaticList of MachinePoint. Only a MachinePoint can be added to this list.
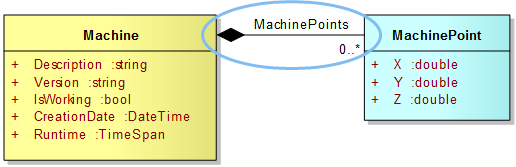
The example below shows how to automatically create a ConceptStaticList using the ConceptAutoCreate attribute.
public class Machine : ConceptComponent
{
    [ConceptAutoCreate]
    public ConceptStaticList<MachinePoint> MachinePoints { get; protected set; }
}
When we work with a ConceptStaticList a good practice is to create a specific class which inherits from ConceptStaticList. The advantage of such a practice is that it is easy to modify the component for example to change its default image (see automatic edition of a data model chapter for more information on ConceptSmallImage and ConceptLargeImage attributes).
public class Machine : ConceptComponent
{
    [ConceptAutoCreate]
    public StaticListMachinePoint MachinePoints { get; protected set; }
}

[ConceptSmallImage(typeof(StaticListMachinePoint), "/Images/MachinePoints32x32.png")]
[ConceptLargeImage(typeof(StaticListMachinePoint), "/Images/MachinePoints64x64.png")]
public class StaticListMachinePoint : ConceptStaticList<MachinePoint>
{ }
Concept provides a component which enables us to manage elements of different nature and inherit from the same abstract class and automatically serialize all its children. This component is a ConceptDynamicList. Below is the UML representation of a ConceptDynamicList of MachineElement. Only machine elements (Axis, Light or Robot) can be added inside the ConceptDynamicList
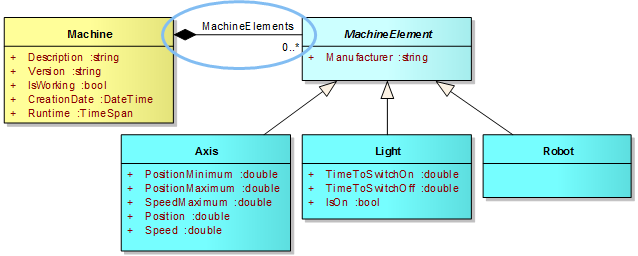
The example below shows how to automatically create a ConceptDynamicList using the ConceptAutoCreate attribute.
public class Machine : ConceptComponent
{
    [ConceptAutoCreate]
    public ConceptDynamicList<MachineElement> MachineElements { get; protected set; }
}
When we work with a ConceptDynamicList a good practice is to create a specific class which inherits from ConceptDynamicList. The advantage of such apractice is that it is easy to modify the component for example to change its default image (see automatic edition of a data model chapter for more information on ConceptSmallImage and ConceptLargeImage attributes).
public class Machine : ConceptComponent
{
    [ConceptAutoCreate]
    public DynamicListMachineElement MachineElements { get; protected set; }
}

[ConceptSmallImage(typeof(DynamicListMachineElement), "/Images/MachineElement32x32.png")]
[ConceptLargeImage(typeof(DynamicListMachineElement), "/Images/MachineElement64x64.png")]
public class DynamicListMachineElement : ConceptDynamicList<MachineElement>
{ }
Concept provides two different components to link elements of the same hierarchical model :
To find the elements linked, Concept uses the relative path from the link's container. This means that all linked elements must be contained somewhere in the model and must have a common root in the model. The path to linked elements is also used to automatically serialize the links.
A ConceptSingleLink represents a natural link existing between two elements. Below is the UML representation of a ConceptSingleLink of Axis. Only an axis contained somewhere in the model can be linked to this element.

The example below shows how to automatically create a ConceptSingleLink using the ConceptAutoCreate attribute.
public class Robot : MachineElement
{
    [ConceptAutoCreate]
    public ConceptSingleLink<Axis> AxisXLink { get; protected set; }
}
The linked element of a ConceptSingleLink is easily modifiable by code. This element is accessible through the Reference property. To work more efficently and to enable us to write shorter code, we usually create a wrapper to access the referenced component.
public class Robot : MachineElement
{
    [ConceptAutoCreate]
    public ConceptSingleLink<Axis> AxisXLink { get; protected set; }

    public Axis AxisX { get { return AxisXLink.Reference; } }
}
|
We have established a naming convention for ConceptSingleLink properties. This convention enables us to understand the function of the property only with its name. The name of a ConceptSingleLink property is : NameOfElement + Link The name of a wrapper property is only : NameOfElement. |
A ConceptMultipleLink represents a natural link existing between multiple elements. Below is the UML representation of a ConceptMultipleLink of Axis. Only axes contained somewhere in the model can be linked to this element.
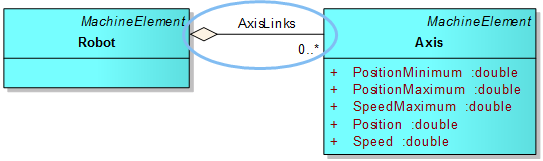
The example below shows how to automatically create a ConceptMultipleLink using the ConceptAutoCreate attribute.
public class Robot : MachineElement
{
    [ConceptAutoCreate]
    public ConceptMultipleLink<Axis> AxisLinks { get; protected set; }
}
Here is a list of the most used methods and properties of a ConceptMultipleLink :
As explained before, the links are defined and kept using a path to find the referenced element. If the path changes, e.g. when the name of a component has been changed, the referenced component will be lost. The Concept links gives the possibility to activate the path modifications tracking in order to keep the referenced component even when the path changes. There are two solutions to activate the tracking of modifications made to paths.
The first solution is to set the static property LinkedToElement to true. In this case, all links declared in the application will have the path modifications tracking activated. It is possible to activate this function in the constructor of the FrameworkController (See chapter Application root in introduction to application business model).
public sealed class FrameworkController
{
    private FrameworkController()
    {
        ConceptLink.LinkedToElement = true;
    }
}
The second solution is to activate the path modifications tracking on each separate link declared in the code by setting the property ElementLinked to true. This solution gives the possibility to specifically choose which links should track modifications made to their linked elements paths.
public class Robot : MachineElement
{
    public Robot ()
    {
        AxisXLink.ElementLinked = true;
    }

    [ConceptAutoCreate]
    public ConceptSingleLink<Axis> AxisXLink { get; protected set; }
}
What happens when we try to make a link between two separate hierarchical models?
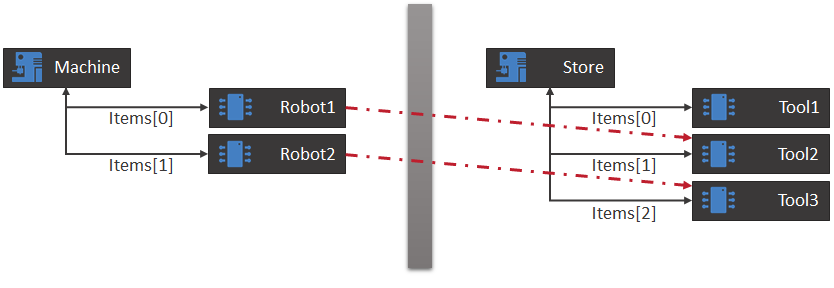
In this case, it is not possible to make a relative link between the two hierarchical models, because they don’t have a common root. There are two ways to implement such a link, the use of ConceptRegistry and the use of Concept repository.
The principle of this solution is to use ConceptRegistry object as a common root to make links between the two hierarchical models.
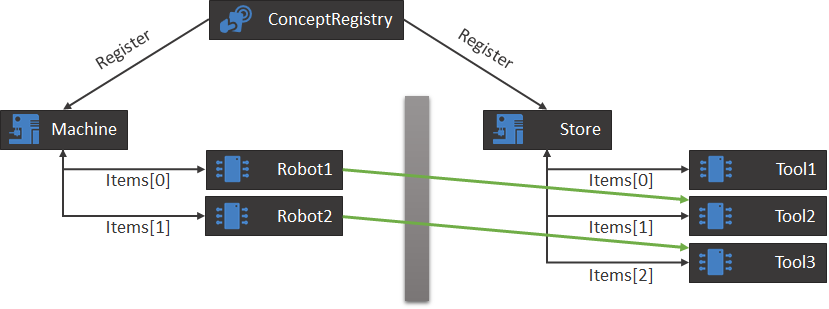
To implement this solution, the first step is to register the two hierarchical models in the ConceptRegistry. It is possible to perform this task in the Load method of FrameworkController (For more information on FrameworkController see chapter application root in introduction to application business model).
Public sealed class FrameworkController
{
    public void Load()
    {
        Machine = new Machine();
        Store = new Store();
        ConceptRegistry.Registry.RegisterReferential(Machine);
        ConceptRegistry.Registry.RegisterReferential(Store);
    }
    public Machine Machine { get; private set; }
    public Store Store { get; private set; }
}
The second step is to modify the Referentials of each link made with the second hierarchical model. In this case, there are two Referentials, the first is the current object for relative links with the current model and the second is the store referential for absolute links with the store model.
public class Robot : MachineElement
{
    public Robot()
    {
        ToolLink.Referentials = new string[] { PathThis, FrameworkController.Instance.Store.Name };
    }
    [ConceptAutoCreate]
    public ConceptSingleLink<Tool> ToolLink { get; protected set; }
}
The principle of this solution is to add the store model to the machine repository to make links between these two hierarchical models.
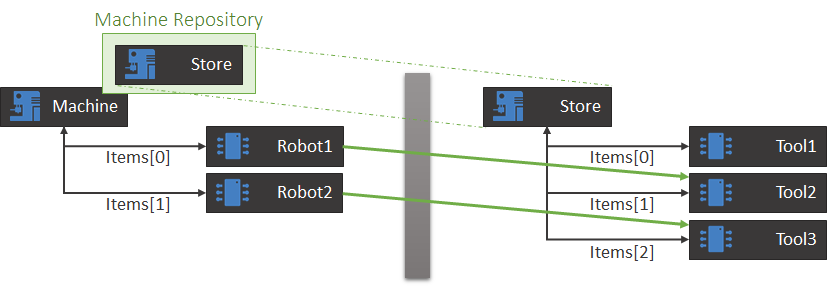
To implement this solution, simply add the store to the machine repository. It is possible to perform this task in the Load method of the FrameworkController (For more information on FrameworkController see chapter application root in introduction to application business model).
Public sealed class FrameworkController
{
    public void Load()
    {
        Machine = new Machine();
        Store = new Store();
        Machine.AddRepository(Store);
    }
    public Machine Machine { get; private set; }
    public Store Store { get; private set; }
}
With this solution, it will be possible to work with two referentials, the first is the current object for relative links with the current model and the second is the store referential for absolute links with the store model.